


Hello! I'm Orsi, the girl who ended up modeling most of the trees for this game. When I joined the team two years ago, I didn't think I would be doing much serious environment modeling. I was fresh out of school, hired to develop some interesting, hidden things around the island. For the first six months or so, I did a lot of brainstorming and playing around in the engine, but nothing that improved the aesthetics of the island in any significant way. However, since some of my projects involved mocking up certain types of trees, I realized that tree modeling is one of my favorite ways to unwind. So, when I got burned out working on a particularly challenging project, I started to volunteer to make tree sets.
Back then, most of the trees around the island were variations of an oak-like tree, seen in the previous tree updates. The landscape architects had plans for different tree species for each unique area, but the other artists didn't seem to enjoy modeling vegetation, so they mostly focused on the buildings and paths, and used the old trees we already had to complete the scene. The result was a lot of architecturally distinct areas, set mostly in the same generic oak forest environment.
When I added my first few tree sets, the other artists grew excited and started letting me model or modify trees for them, and certain places started to really pop out as unique, coherent areas. Here are some examples of the trees I created:
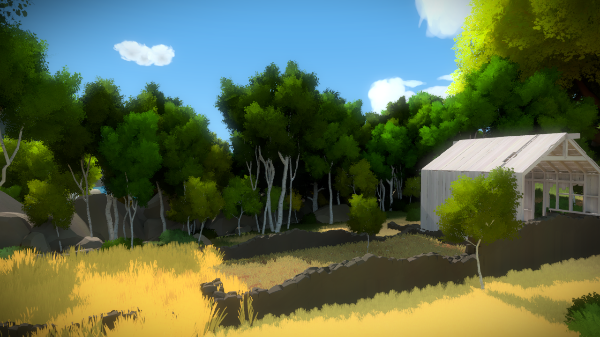
Near the starting point of the game, there is an agricultural field lined with birch trees. Luis, an other artist on the project, made some birches of his own. They looked nice, but they had short, stubby trunks covered up by with big circular clumps of foliage. When they were placed around the area, they just didn't feel like a birch forest to me. I missed the defining characteristic of a birch forest: the thin, graceful trunks that parallax beautifully as you walk past them. I asked Luis if he would mind if I made some birches of my own, and he was happy to let me do it. You can see the result above.
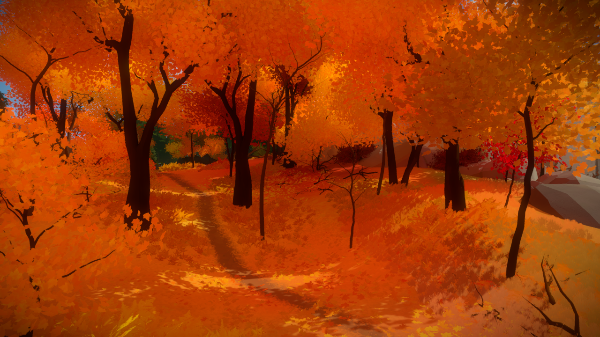
The autumn forest existed way before I joined the team, but also used to consist of differently colored generic oak trees. I made a set of maple trees instead, with dark, tall trunks and thin sprays of foliage positioned loosely around the branches. These were probably the most controversial trees I made. We spent a long time debating whether the impressionistic way the leaves were scattered around the branches was working with the style of the game or not. In the end, everybody seemed to like them too much to change them. I think this way of modeling the foliage allowed for the airy, glowing, golden feel I was trying to achieve. This was also the place I first realized what a big impact trees had in defining the area. Once I placed the trees, all I had to do was create some ground textures and grasses to create the forest you see above.
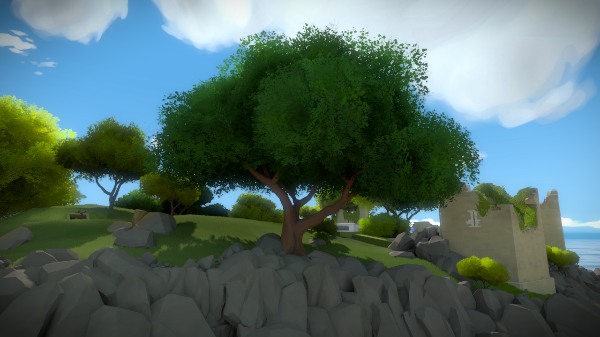
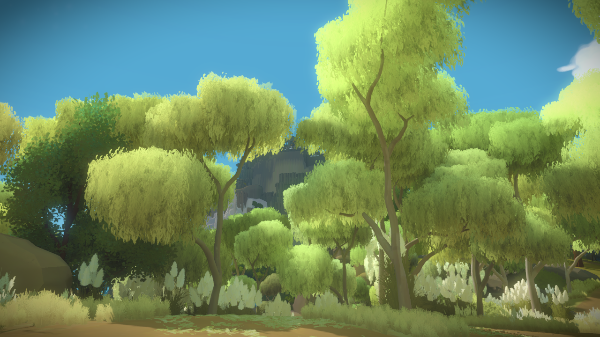
In this screenshot, you can see some oaks I made to replace Shannon's old ones. I created a set of three, in different stages of growth, which is usually the way I approach tree making. It is the best way to create an area that feels like it is alive and still growing. The huge oak in the foreground was one of the few modular trees I actually had to sculpt more detail into, since the trunk got so huge it needed to be broken up a little.
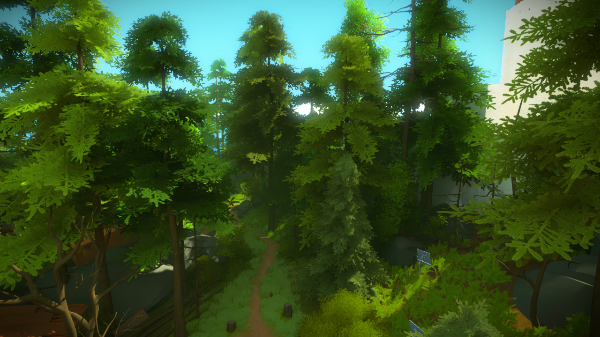
The pine forest is very dear to my heart, because it's my project...and I don't mean just the modeling. Jonathan had three puzzles in a mostly empty area, and I decided to explore the concept behind them a bit more. I ended up designing and modeling this whole area, including the puzzles (with tons of feedback and guidance from Jon, of course). The pine trees here were the landscape architect's idea, and I was very excited to model them. I tried to stay away from making them all look too Christmas tree shaped, so I found reference images of older, taller pines with saggy, less regularly spaced branches, and decided to go with that. I especially love the way the light bounces around in the messy foliage.
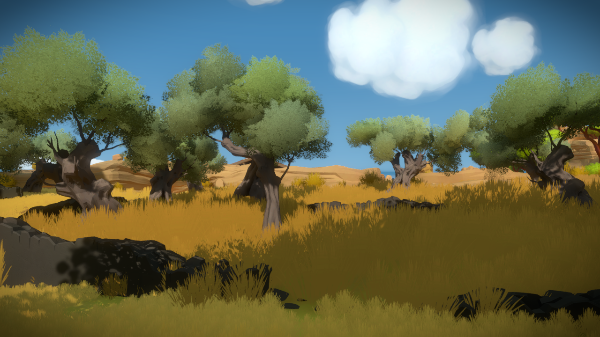
The landscape architects also asked for some mangled, old olive trees in the agricultural area. This was a nightmare to figure out how to model to fit our style, since we don't usually have a lot of detail in objects, and the reference images they provided had crazy twisted trunks full of holes and cracks. I ended up sculpting the trunks in Zbrush, and decimating them, leaving some hard edges. We use this process a lot for other things around the island, but it was the first time I used it for trees. I made the branches modular, and created two significantly different trunks, which the artists can use to combine into even more messed up, mangled shapes. I am still not entirely sure whether I like these or not.
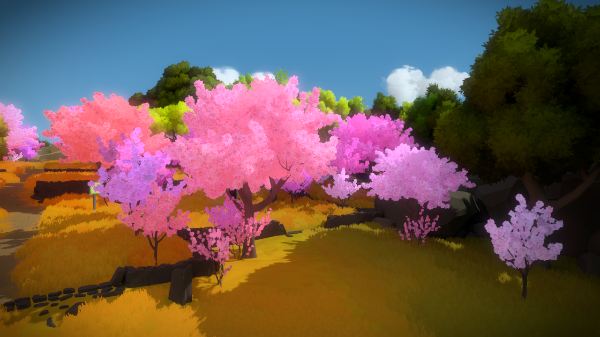
These flowering apple trees took me a while, and they are still not very efficiently textured, but they are getting there. The challenge was to get the silhouette looking like there are branches coated with flowers poking out all over the place. I feel far from finished with these trees, but they seem to be getting a lot of positive feedback, which surprises me constantly.
The eucalyptus forest is a little transitional area I decided to dress up when I had a week to spare. I didn't get very far with the trees, there is actually only one eucalyptus model, and it's not very detailed. I had some difficulty with the very directional foliage. All the leaves had to point down, which was very different form the way I used to make foliage before, where I'd just place planes at random angles in a big bunch. I'm sort of glad I left it where I did, however, because I learned a lot from the following plant I made, and I can apply it to the problem when I revisit these trees during polish.

This last tree is more of a vine, but it's one of my latest creations, and I'm very happy with it. It's a modular wisteria set. There are two bunches of flowers, two trunks (for a corner and for a flat wall), and an independent bunch of vines. All these different pieces can be placed to create varied shapes, to make each plant look unique and and adapt to the surface it's climbing on. The way I created the flowers is how I'm going to re-do the eucalyptus foliage in the future, and I imagine that will make those trees a lot more interesting and beautiful.
Well, these are just some of the trees I made, and the other artists have made some of their own, but these seemed to be a good variety to show off and talk about. Hopefully I didn't ramble on too long, I am just always excited to talk about any aspect of the game I can!
These are all treeriffic!
I know you said you were going to fix them up, but as they stand, the eucalypts aren’t giving me much of a eucalypty feel. They look too lush. I’m used to eucalypts being dry, with lignified leaves.
That’s my contribution. Everything else is wonderful.
I keep coming back to this post because the images are so lovely, with the kind of variety in color, shape and texture that makes real trees and landscapes so beautiful to look at. Thank you for sharing the work with us. If you’d care to provide high-res versions on the click-throughs, I strongly suspect these would swiftly become desktop backgrounds on certain well-placed machines, and gratitude would pile up like fallen apple-flower petals.
Wow! These visuals are stunning. I can’t wait.
Hello Orsi,
I don’t have anything new to add that others haven’t already said. Wonderful job! What I will say though is don’t hesitate to post more on this blog. We don’t get as many updates anymore (which is good because you’re all making such progress!), but us simpletons also can’t wait to play the game so this blog keeps us happy. I’m sure you can tell by the 60 plus comments that we all really enjoyed your post! Cheers! and congrats on your unexpected accomplishments! ;)
Wow! Really goes to show just how much of an impact getting the nature of an area right has on the atmosphere of that place.
The models look great, but as an Australian, the eucalyptus looks a bit off. It might be because they look generally too lush. I get the impression of willow leaves, rather than eucalypt leaves. In my mind, gum trees are usually much more scraggly, but that’s in Australian drought, not the island.
I think that the loose dead bark around the outside is important to the image, but I understand that the styling needs to be minimal.
Anyway, best of luck with this. Loving what you’ve done so, Orsi.
Hi Orsi!
I truly appreciate you taking the time to share your beautiful trees. The images are truly inspirational, and I for one would love a wallpaper of the eucalyptus forest. I have a few questions if you could spare another moment.
Do you have a specific process that you run though when you make these beauties? I would love to learn how you made some of these.
The Witness’s art style looks beautiful and seems to have little detail as you say, but when did as a game artist myself, I’m trying to sort out when a game’s art style comes together. I figure it’s something that is sorted out during the concept phases, but tested during production?
Thanks for your wonderful post Orsi,
EJ
The process for the trees is fairly straightforward: gather a bunch of reference to get the idea for how a certain tree could grow, build the trunk in zshperes, make an adaptive skin for it, push it around with the move tool a little to make it feel more organic, delete excess edge loops, uv and texture. If it is a bigger or more detailed tree, sculpt the detail into the trunk, then decimate it to get the faceted look our game has. For the foliage, I usually make my own leaf brush in photoshop that matches the tree to create the diffuse and opacity map for it. I use the slide normal thief script to push out the normals of a bunch of randomly placed planes out in a sphere, and apply the texture to that to make the foliage, then place it around the tree in a way that makes sense.
As for the art style, we didn’t really have a ‘concept phase’. At first we were just building the game as Shannon, the first artist, started it, but we realized that what we were getting was not very eye catching, and looked more like something that was trying to be realistic but stayed too simplistic in form and texture. When Eric and Luis joined the team, they spent about a month doing tests to see what the style could look like, and they were the ones who came up with the faceted geometry and low-noise textures. Even after the tests, though, every time someone made something new, it was a challenge to figure out how that specific thing could be done within our style constraints. Some really noisy things, like a rough stone fence or a rusted heap of metal, were a real challenge, but it was usually just a matter of figuring out where to put the detail that just hints at the materiality of the thing.
Where could I find and apply the thief script? is it this?
Then, Did you use the script in Maya?
What’s the advantage to creating a leaf brush in photoshop?
Thanks Orsi! Your words and works are an inspiration.
There are two scripts I know of, slide normal thief and normal thief. Not sure if there is a difference, since I only ever used slide normal thief, and it seems to work perfectly. The site we found them on is this one. They are both Max scripts, but there might be something like them for Maya.
The advantage of creating custom leaf brushes in Photoshop is that I can quickly and easily paint matching texture and opacity maps for the foliage of certain trees, and control the shape, density, detail, color variation and angle of the leaves. In most cases it’s way faster (5-10 min) to just make a brush than to spend forever looking for the perfect one online.
Beautiful work. First you transfer the normal with the sphere, after being transferred puts in the trunk?
I thought they must first put the plans in the trunk, then transfer Vertex Normal with the sphere.
Smooth shadow in the middle of the tree is with vertex paint?
edit:
The Witness’s art style looks beautiful and seems to have little detail as you say. As a game artist myself, I’m trying to sort out when a game’s art style comes together. When did the witnesses style feel like it was coming into play easily in comparison to its first art style concept?
Orsi,
I’m curious about the shader for the trees, I recall someone mentioning that the leaves become invisible as the surface normal becomes perpendicular to the camera. I wanted to know if the surface fades out as it comes into alignment or if there is just a cutoff, so if you view the leaves from the unflattering angle they just disappear.
Also do you have an equivalent shader in Maya or zBrush to simulate this when you work? It seems like a really cool idea to make the tree look less video gamey, but I’m just haveing a little trouble visualizing how it looks.
Thanks
Ignacio made us a great foliage shader, with a slider for what angle the planes fade in and an other for when they fade out. The great thing about our workflow is that we put everything together in Maya scenes, and it just gets exported like that to the game, by layer. So we don’t need an equivalent shader, we apply a shader to a mesh in Maya, and that is what it will be using in game.
man, how do you manage to have so much volume with foliage ?
Normal Thief helps, and so does the style of the game, meaning we don’t need to show a lot of precise branch structure everywhere.
As someone who enjoyed mostly making trees and a forest in UE4, reading this was nice :)
Can you make these trees in unreal? I tried a lot and I could not.
Thank you for the great post, Orsi!
I wonder if you played around with some kind of screen-space texture for the leaves.
It would probably look weird but it may have been an interesting visual direction for the trees!